블로그 Why Most PELLET PRESS XRF SAMPLE PREPARATION Fail: Common Issues and Solutions
Why Most PELLET PRESS XRF SAMPLE PREPARATION Fail: Common Issues and Solutions

Why Most PELLET PRESS XRF SAMPLE PREPARATION Fail: Common Issues and Solutions

3 weeks ago

Table of Contents

Introduction to XRF Sample Preparation

In the realm of X-ray fluorescence (XRF) analysis, the precision of sample preparation is paramount to obtaining accurate and reliable results. Pellet pressing plays a crucial role in this process, ensuring that samples are homogenized and ready for analysis. However, common issues such as improper particle size, contamination, incorrect binder choice, and inadequate pressure application can lead to significant errors. This article delves into the most frequent pitfalls in PELLET PRESS XRF SAMPLE PREPARATION and offers practical solutions to overcome them, ultimately guiding you towards achieving the highest level of precision in your XRF analysis.

Particle Size: The Foundation of Successful Pellet Preparation

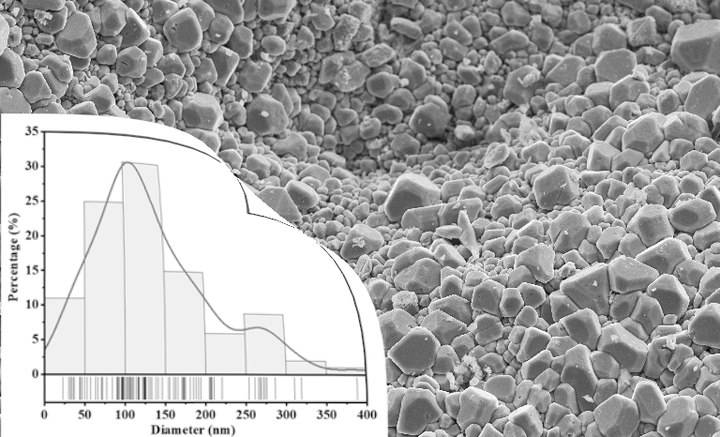
Particle size is a critical factor in the preparation of pressed pellets, significantly impacting the accuracy and reliability of analytical results. Achieving the ideal particle size, typically less than 50µm, is essential for several reasons. First, smaller particle sizes ensure better homogeneity within the sample. When particles are too large or vary in size, it can lead to inconsistencies in the distribution of elements within the pellet, which can result in skewed analytical data.

The Importance of Uniform Particle Size

Uniform particle size is paramount for several reasons. Smaller particles allow for more efficient compaction and binding when the pellet is pressed. This uniformity ensures that the sample compresses evenly, leading to a more consistent and reliable analytical result. In contrast, larger or variable particle sizes can create heterogeneities within the pellet, where different regions of the pellet may contain different concentrations of elements. This heterogeneity can lead to erroneous readings, as the analytical equipment may not sample the entire pellet uniformly.

Achieving the Ideal Particle Size

To achieve the ideal particle size of less than 50µm, various laboratory techniques can be employed. Common methods include using crushers, grinders, and millers to reduce the particle size of the sample before pressing. It is commonly considered acceptable to have a particle diameter of 40 µm or lower. These techniques ensure that the sample is finely ground, allowing for better uniformity and consistency in the final pellet.

Particle Size

Impact of Particle Size on Analytical Results

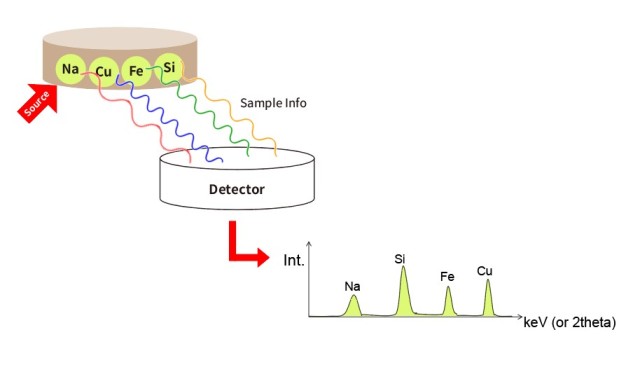
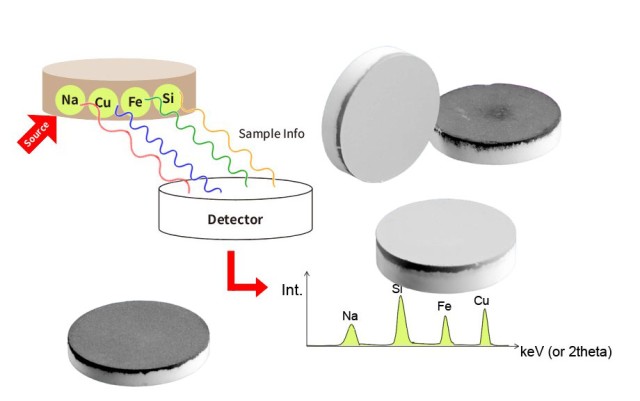
The impact of particle size on analytical results cannot be overstated. Smaller particle sizes are crucial for producing pellets that provide the best analytical results. For instance, in X-ray fluorescence (XRF) analysis, the sampling depth or critical escape depth for elements within a sample is energy-dependent. Longer wavelength elements such as sodium (Na) have smaller escape depths than shorter wavelength elements such as iron (Fe). This means that Na analysis is only sampling the first 10µm or so of a sample. Therefore, any heterogeneity within this shallow depth can significantly affect the accuracy of the analysis.

In contrast, larger or variable particle sizes can lead to heterogeneities in the sample. These heterogeneities can result in inconsistent element distribution within the pellet, leading to unreliable analytical data. For example, if a pellet contains regions with varying particle sizes, the analytical equipment may not sample these regions uniformly, leading to discrepancies in the measured concentrations of elements.

Best Practices for Particle Size Control

To ensure the best possible analytical results, it is essential to follow best practices for particle size control. This includes using appropriate grinding and milling techniques to achieve a uniform particle size of less than 50µm. Attention to detail and consistency in the preparation process are also critical. By ensuring that the sample is ground to the ideal particle size, analysts can minimize the risk of heterogeneities and achieve more accurate and reliable analytical results.

In summary, particle size is the foundation of successful pellet preparation. Achieving and maintaining a uniform particle size of less than 50µm is crucial for ensuring the homogeneity of the sample, which in turn leads to more accurate and reliable analytical results. By following best practices and paying close attention to the preparation process, analysts can significantly improve the quality of their analytical data.

Contamination: The Silent Saboteur in XRF Analysis

Contamination is one of the most significant challenges in X-ray fluorescence (XRF) analysis, particularly during the sample preparation process. The grinding stage is a critical point where contamination can easily occur, leading to inaccurate and misleading results. Understanding the sources of contamination, implementing effective prevention methods, and recognizing the consequences of contamination are essential for maintaining the integrity of XRF analysis.

Sources of Contamination

Contamination in XRF analysis can arise from various sources, but the grinding process is particularly vulnerable. During grinding, external components from the sample preparation instrument can be inadvertently introduced into the sample. This can happen if the grinding tools or containers are not properly cleaned between samples, leading to cross-contamination. For instance, residues from previous samples can remain on the grinding tools and be transferred to the new sample, altering its elemental composition.

Another common source of contamination is the use of inappropriate materials for sample preparation. For example, if the grinding tools are made of materials that can shed particles or if the containers are not inert, these materials can introduce unwanted elements into the sample. Additionally, environmental factors such as dust, humidity, and chemical vapors in the laboratory can contribute to contamination.

Methods to Prevent Contamination

Preventing contamination in XRF analysis requires meticulous attention to detail and the implementation of rigorous protocols. One of the most effective methods is to ensure that all grinding tools and containers are thoroughly cleaned and sterilized before each use. This can be achieved using solvents or specialized cleaning agents that are compatible with the materials being analyzed.

Another strategy is to use inert materials for grinding tools and containers. Materials such as borosilicate glass or high-purity alumina are less likely to introduce contaminants into the sample. Additionally, it is important to work in a clean environment, preferably in a dedicated sample preparation area that is free from dust and other potential contaminants.

For powder samples, it is crucial to prepare cuvettes and films with care. There are many types of films available for XRF, and selecting the most suitable type for a specific task and device is essential. Consulting with the supplier can help ensure that the chosen film is appropriate for the sample and will not introduce contaminants.

disinfect

Consequences of Contamination on XRF Results

Contamination can have severe consequences on XRF results, leading to inaccurate and unreliable data. If a sample is contaminated during the grinding process, the elemental composition measured by the XRF instrument will be incorrect. This can result in false positives or negatives, misinterpretation of data, and ultimately, incorrect conclusions.

For example, if a sample intended to be analyzed for lead content is contaminated with calcium from a previous sample, the XRF results may show an artificially high lead concentration. This could lead to a misdiagnosis of lead contamination, with potential implications for regulatory compliance and public health.

Moreover, contamination can also affect the precision and reproducibility of XRF measurements. If contamination occurs during the preparation of multiple samples, the variability in results may increase, making it difficult to compare data across different samples. This can undermine the reliability of the analysis and compromise the validity of any conclusions drawn from the data.

Conclusion

Contamination is a silent saboteur in XRF analysis, particularly during the grinding process. Understanding the sources of contamination, implementing effective prevention methods, and recognizing the consequences of contamination are crucial for maintaining the accuracy and reliability of XRF results. By taking meticulous care in sample preparation, using appropriate materials, and working in a clean environment, researchers can minimize the risk of contamination and ensure the integrity of their XRF analysis.

Binder Choice: The Key to Homogeneous Pellets

The selection of an appropriate binder is a critical aspect of pellet preparation, as it directly influences the homogeneity and stability of the final pellet. Binders serve as the "glue" that holds the sample particles together, ensuring that the pellet remains intact during analysis and does not contaminate the spectrometer with loose powder. The most common binders used in pellet preparation are cellulose/wax mixtures, which are known for their ability to homogenize with the sample and bind the particles together effectively during the pressing process.

Role of Binders in Pellet Preparation

Binders play a crucial role in the pelletization process by facilitating the formation of a cohesive pellet from a powder sample. Without a binder, the sample particles would not adhere to each other, leading to a loose and unstable pellet that could easily break apart or contaminate the spectrometer. The binder acts as a medium that allows the particles to stick together, forming a solid and uniform pellet that can be analyzed without interference from loose particles.

Common Types of Binders

Cellulose/Wax Mixtures

Cellulose/wax mixtures are the most widely used binders in pellet preparation due to their effectiveness and ease of use. These binders are typically added in proportions of 20-30% to the sample, depending on the specific requirements of the analysis. The cellulose component provides structural integrity to the pellet, while the wax ensures that the particles adhere to each other. This combination allows for the formation of a homogeneous pellet that is both strong and stable.

Wax mixture

Acrylic Binders

In some cases, acrylic binders may be used as an alternative to cellulose/wax mixtures. However, acrylic binders can be more challenging to homogenize with the sample, often requiring manual mixing rather than being added automatically during grinding. This can lead to inconsistencies in the final pellet, as the binder may not distribute evenly throughout the sample.

Pre-Mixed Pellets

For convenience, some binders are available as pre-mixed pellets that can be automatically added to the mill during grinding. These pre-mixed pellets ensure that the binder is evenly distributed throughout the sample, leading to more consistent and reliable results. However, the choice of pre-mixed pellet should be carefully considered to ensure that it is compatible with the specific sample being analyzed.

Selecting the Most Suitable Binder

The selection of the most suitable binder for a given sample depends on several factors, including the type of sample, the desired pellet strength, and the specific requirements of the analysis. Here are some key considerations to keep in mind when selecting a binder:

Sample Type

Different samples may require different types of binders. For example, samples that are difficult to grind or contain hard-to-grind phases may benefit from a binder that can better homogenize with the sample and hold the particles together. In such cases, a cellulose/wax mixture may be more effective than an acrylic binder.

Pellet Strength

The strength of the final pellet is another important consideration. A stronger pellet is less likely to break apart during handling or analysis, reducing the risk of contamination and improving the accuracy of the results. Cellulose/wax mixtures are generally preferred for their ability to create strong and stable pellets.

Analysis Requirements

The specific requirements of the analysis, such as the type of spectrometer being used or the sensitivity of the measurement, may also influence the choice of binder. For example, some binders may produce a more uniform pellet that is better suited for high-resolution analysis, while others may be more effective at preventing contamination.

Best Practices for Binder Selection

To ensure the best possible results, it is important to follow best practices when selecting and using a binder. Here are some tips to help you get the most out of your binder:

Test Multiple Binders

If possible, test multiple binders with your sample to determine which one produces the most consistent and reliable results. This can help you identify the optimal binder for your specific application.

Pay Attention to Proportions

The proportion of binder to sample is crucial for achieving a homogeneous pellet. Adding too much binder can lead to a pellet that is too hard and brittle, while adding too little can result in a weak and unstable pellet. Typically, a proportion of 20-30% binder to sample is recommended, but this may vary depending on the specific binder and sample.

Ensure Even Distribution

Regardless of the type of binder used, it is important to ensure that the binder is evenly distributed throughout the sample. This can be achieved by carefully mixing the binder with the sample or by using a pre-mixed pellet. Uneven distribution of the binder can lead to inconsistencies in the final pellet, affecting the accuracy of the analysis.

Monitor Particle Size

The particle size of the sample can also influence the effectiveness of the binder. Larger particle sizes can result in a less homogeneous pellet, as the binder may not be able to hold all the particles together effectively. Grinding the sample to a consistent particle size can help improve the performance of the binder and produce a more uniform pellet.

Conclusion

The choice of binder is a critical factor in the preparation of homogeneous and stable pellets for analysis. By selecting the most suitable binder for your sample and following best practices for its use, you can ensure that your pellets are consistent, reliable, and free from contamination. Whether you choose a cellulose/wax mixture, an acrylic binder, or a pre-mixed pellet, careful consideration of the factors discussed above will help you achieve the best possible results in your analysis.

Pellet Thickness: Ensuring Sufficient Sampling Depth

In X-ray fluorescence (XRF) analysis, the thickness of the pressed pellet is a critical factor that directly influences the accuracy and reliability of the analytical results. The pellet must be sufficiently thick to ensure that the X-rays produced in the sample can escape without being reabsorbed, allowing for precise measurement of the elements present. This section delves into the importance of pellet thickness, how to calculate the required thickness, and common mistakes that can lead to inaccurate results.

Pellet

Importance of Pellet Thickness

The primary concern when preparing pressed pellets for XRF analysis is ensuring that the pellet is "infinitely thick" to the X-ray beam for all elements being measured. This means that the pellet thickness should exceed the escape depth of the highest energy element in the sample. If the pellet is too thin, X-rays produced in the sample may be reabsorbed before they can reach the detector, leading to underestimation of the element's concentration.

The escape depth of an element is dependent on its energy level, with higher energy elements typically having deeper escape depths. For instance, elements with higher atomic numbers (e.g., iron, copper) will have deeper escape depths relative to lower energy elements (e.g., sodium, magnesium). Therefore, the pellet must be thick enough to accommodate the deepest escape depth of the elements of interest.

Calculating Required Pellet Thickness

To determine the required pellet thickness, it is essential to consider the escape depth of the highest energy element in the sample. The escape depth can be calculated using the mass absorption coefficients of the elements present in the sample. The mass absorption coefficient is a measure of how much a material can absorb X-rays and is dependent on the element's atomic number and the energy of the X-rays.

For practical purposes, a pellet made with 8-10 grams of sample for a 32mm diameter pellet or 13-15 grams of sample for a 40mm diameter pellet is generally sufficient for the elements that can be measured by even the most powerful wavelength-dispersive X-ray fluorescence (WDXRF) instruments currently available. These weights ensure that the pellet is sufficiently thick to prevent reabsorption of X-rays and provide accurate analytical results.


Common Mistakes in Pellet Thickness

One of the most common mistakes in preparing pressed pellets is underestimating the required thickness. This can occur if the pellet is not thick enough to accommodate the deepest escape depth of the elements being measured. As a result, the X-rays produced in the sample may be reabsorbed, leading to inaccurate measurements.

Another common error is failing to account for the average atomic mass of the sample. The absorption capability of the sample is directly proportional to its average atomic mass, meaning that heavier elements will absorb more X-rays than lighter elements. Therefore, it is crucial to consider the average elemental composition of the sample when determining the required pellet thickness.

Contamination Considerations

In addition to pellet thickness, contamination is another critical factor that can affect the quality of XRF analysis. Contamination can occur during the sample grinding process and may originate from the sample preparation device or sample-to-sample cross-contamination. To minimize contamination, it is essential to use clean equipment and ensure that the sample preparation process is conducted in a controlled environment.

Best Practices for Pellet Preparation

To ensure accurate and reliable XRF analysis, it is essential to follow best practices for pellet preparation. This includes using the appropriate amount of sample to achieve the required pellet thickness, selecting the right binder, and applying consistent pressure during the pressing process. Attention to detail and consistency in the preparation process are key to minimizing errors and obtaining high-quality analytical results.

In summary, the thickness of the pressed pellet is a critical factor in XRF analysis that directly impacts the accuracy and reliability of the analytical results. By ensuring that the pellet is sufficiently thick to accommodate the deepest escape depth of the elements being measured, and by following best practices for pellet preparation, analysts can obtain precise and accurate measurements of the elements present in the sample.

Pressure Application: Balancing Compression and Homogeneity

Achieving optimal pressure during pellet pressing is crucial for creating high-quality pellets that are free from voids and exhibit consistent properties. The process involves applying the right amount of pressure to compress the sample and recrystallize the binder, ensuring that the final product is both dense and homogeneous. This section delves into the critical aspects of pressure application, including the effects of over-pressing and under-pressing, and techniques to achieve the optimal pressure for your samples.

Importance of Proper Pressure Application

The primary goal of pellet pressing is to eliminate void spaces within the pellet, which can significantly affect the intensity of lighter elements in your sample. A well-compressed pellet should be dense enough to prevent any internal voids, ensuring uniform distribution of the sample and binder. To achieve this, it is essential to apply sufficient pressure to fully compress the sample and recrystallize the binder.

Experimentation and Optimal Pressure Range

Finding the optimal pressure for your specific sample involves experimentation. Start by applying increasing pressure to your samples and observe the intensity of lighter elements. Most samples reach their maximum intensity at pressures between 25-35 metric tons (T) for 1-2 minutes. This range is a good starting point, but individual samples may require adjustments based on their specific properties.

press

Avoiding Over-Pressing and Under-Pressing

Over-pressing can lead to several issues, including exceeding the fracture strength of the compact, resulting in cracks or "capping" where the top of the pellet separates from the rest. Super high forces do not necessarily yield better pellets and can cause more harm than good. On the other hand, under-pressing can leave void spaces within the pellet, leading to inconsistent results and lowered intensity for lighter elements.

Techniques for Optimal Pressure Application

  1. Slow Pressure Release: After applying the necessary pressure, release it slowly to prevent cracking of the pellet surface. Rapid pressure release can cause stress fractures, compromising the integrity of the pellet.

  2. Die Alignment and Loading: Ensure that your press and die are properly aligned to apply uniform pressure. Overfilling the die sleeve with powder can lead to uneven compression and should be avoided. Load the die to no more than 50% of the yield strength of the steel to prevent exceeding its capacity.

  3. Pellet Dimensions: Maintain a balanced ratio between the height and diameter of the pellet. Pellets that are significantly longer than their diameter can experience greater stresses near the top plunger, leading to cracking. If pressing longer pellets, consider using lower forces, lubricating the die, and using an o-ring between the base plate and sleeve to distribute stresses more evenly.

  4. Even Powder Distribution: When transferring the sample mix into the die cavity, ensure it is evenly spread. Uneven distribution can result in inconsistent compression and voids within the pellet.

Practical Steps for Pressure Application

  1. Fix the Pellet Press: Secure the die into the press cavity and ensure it is properly aligned.
  2. Transfer the Sample: Use a metal spatula to evenly spread the ground sample mix into the die cavity.
  3. Distribute Particles: Insert the bolt press and rotate it to distribute the particles evenly.
  4. Secure the Die Set: Transfer the die set to the hydraulic pellet press and secure it tightly by rotating the wheel.
  5. Apply Pressure: Close the valve of the hydraulic press and pull the level to apply pressure until the handle becomes tight.
  6. Release Pressure: To release the die, first loosen the pressure, then move up the upper wheel of the press, and finally take out the die.

By carefully balancing compression and homogeneity, you can achieve high-quality pellets that meet your experimental requirements. Proper pressure application, combined with attention to detail in each step of the process, ensures that your pellets are dense, void-free, and consistent in properties.

Dilution Ratio: Fine-Tuning for Accurate Results

The dilution ratio plays a critical role in X-ray fluorescence (XRF) analysis, influencing the accuracy and reliability of the results. Properly determining and applying the appropriate dilution ratio is essential to mitigate common issues related to sample preparation and matrix effects, ensuring that the elemental composition of the sample is accurately represented.

Dilution ratio

Impact of Dilution Ratio on XRF Analysis

In XRF analysis, the dilution ratio directly affects the intensity of the X-ray lines emitted by the sample. A well-chosen dilution ratio can balance the matrix effects, such as absorption and enhancement, which can distort the measured intensities. Absorption occurs when the elements in the sample absorb the X-rays emitted by other elements, reducing the intensity of the X-rays that reach the detector. Enhancement, on the other hand, happens when the presence of high-energy elements in the sample excites the atoms of the element being analyzed, increasing the intensity of the X-ray lines.

By carefully selecting the dilution ratio, these matrix effects can be minimized, leading to more accurate and reproducible results. A proper dilution ratio ensures that the sample is neither too concentrated, which can lead to excessive absorption, nor too dilute, which can result in weak signal intensities that are difficult to measure accurately.

Determining the Appropriate Dilution Ratio

Determining the appropriate dilution ratio involves a combination of theoretical considerations and practical experimentation. The goal is to achieve a homogeneous mixture where the sample is evenly distributed throughout the matrix material. Here are some key steps to follow:

  1. Understand the Sample Composition: Start by thoroughly understanding the elemental composition of your sample. This includes knowing the concentrations of the major, minor, and trace elements present. This information is crucial for predicting potential matrix effects.

  2. Select a Suitable Matrix Material: The matrix material should be chemically inert and have a composition that minimizes absorption and enhancement effects. Common choices include lithium tetraborate (LiBO₂) and boric acid (H₃BO₃), which are known for their ability to form stable, homogeneous mixtures with a wide range of sample types.

  3. Perform Preliminary Dilutions: Begin with a range of dilution ratios and measure the resulting intensities. Use these measurements to assess the impact of different ratios on the intensity of the X-ray lines. Look for a ratio where the intensities are stable and where the matrix effects are minimized.

  4. Optimize for Homogeneity: Ensure that the sample is finely ground to a grain size of less than 75 µm. This is essential for achieving a homogeneous mixture, which is critical for accurate XRF analysis. The finer the grains, the better the mixture will be, reducing the likelihood of voids and uneven surfaces in the final pellet.

  5. Evaluate Stability and Reproducibility: Once a suitable dilution ratio is identified, perform multiple measurements to ensure stability and reproducibility. Variations in the results can indicate issues with the sample preparation process, such as incomplete mixing or variations in the grain size.

Common Issues Related to Improper Dilution

Improper dilution can lead to several common issues in XRF analysis:

  1. Excessive Absorption: Over-concentrated samples can result in excessive absorption, where the X-rays emitted by the sample are significantly absorbed by other elements in the sample. This can lead to underestimation of the concentrations of certain elements.

  2. Weak Signal Intensities: Conversely, under-concentrated samples can result in weak signal intensities, making it difficult to obtain accurate measurements. This is particularly problematic for trace elements, which may not produce a strong enough signal to be reliably detected.

  3. Matrix Effects: Improper dilution can exacerbate matrix effects, such as absorption and enhancement. These effects can distort the measured intensities, leading to inaccurate results.

  4. Inhomogeneous Mixtures: If the sample is not finely ground or if the dilution ratio is not optimized, the resulting mixture may be inhomogeneous. This can lead to variations in the measured intensities, even within the same sample, reducing the reliability of the results.

Conclusion

Fine-tuning the dilution ratio is a critical step in achieving accurate and reliable XRF analysis results. By carefully selecting the appropriate dilution ratio and ensuring a homogeneous mixture, you can minimize matrix effects and other common issues related to sample preparation. This approach not only improves the accuracy of your measurements but also enhances the reproducibility of your results, making it easier to compare data across different samples and experiments.

Sample to Sample Cross Contamination: Preventing Interference

Sample to sample cross contamination is a critical issue in analytical laboratories, potentially leading to inaccurate results and compromised data integrity. This section delves into the methods to minimize cross-contamination, the importance of cleaning protocols, and best practices for ensuring sample purity.

Understanding Cross Contamination

Cross contamination occurs when residues from one sample interfere with the analysis of another, leading to skewed results. This is particularly problematic in environments where a wide range of sample types are analyzed, as the risk of contamination increases with the diversity of samples. For instance, if a sample preparation device like a pulverizer is not thoroughly cleaned between uses, it can introduce elements from one sample into the next, distorting the analysis.

cross infection

Methods to Minimize Cross Contamination

  1. Use of Dedicated Equipment: One effective method to minimize cross contamination is the use of dedicated equipment for specific types of samples. This ensures that residues from one type of sample do not interfere with another. For example, a dedicated pulverizer for metal samples can prevent the introduction of metal elements into non-metal samples.

  2. Thorough Cleaning Protocols: Implementing rigorous cleaning protocols is essential. After each use, equipment should be cleaned according to a standardized procedure. This includes using appropriate solvents or cleaning agents and ensuring that all residues are removed. For instance, steel grinding vessels should be cleaned with solvents that can dissolve iron, nickel, and chromium residues.

  3. Sample Preparation Techniques: The technique used for sample preparation can also influence the risk of cross contamination. For example, when preparing calibration standards for XRF analysis, it is crucial to match the matrix of the calibration standards to that of the samples. This helps in improving accuracy and reducing the risk of contamination. Additionally, using high-quality calibration blanks with a Certificate of Analysis can provide confidence in the integrity of the calibration process.

  4. Use of Sample Holders: For smaller and thinner samples, using a sample holder can prevent interference from objects behind the sample. This ensures a more accurate analysis by maintaining a consistent distance between the sample and the detection window of the spectrometer.

  5. Multiple Surface Measurements: When testing large metal samples, it is advisable to measure several surfaces multiple times to obtain more accurate results. This reduces the likelihood of skewed data due to localized contamination on a single surface.

Importance of Cleaning Protocols

Cleaning protocols are the backbone of preventing cross contamination. They ensure that equipment is free from residues that could interfere with subsequent analyses. Regular maintenance and adherence to standard operating procedures (SOPs) for startup and shutdown are crucial. For example, frequent checks of instruments to confirm they are operating as expected can prevent issues that could lead to contamination.

Best Practices for Sample Preparation

The primary goals of sample preparation include ensuring sample homogeneity and managing potential interferences from the sample’s original form. Techniques that offer advantages in terms of speed and the number of samples that can be prepared at one time are particularly valuable in high-throughput labs. However, it is essential to balance speed with the need for accuracy and integrity.

Conclusion

Preventing sample to sample cross contamination is vital for maintaining the accuracy and reliability of analytical results. By implementing dedicated equipment, rigorous cleaning protocols, and best practices in sample preparation, laboratories can significantly reduce the risk of contamination. This not only ensures the integrity of individual analyses but also contributes to the overall credibility of the laboratory's data.

Best Practices for Error Reduction in XRF Pellet Preparation

When it comes to X-Ray Fluorescence (XRF) analysis, the quality of the results heavily depends on the preparation of the samples. The process of creating pressed pellets for XRF analysis is a critical step that can significantly impact the accuracy and reliability of the data. To minimize errors and ensure consistent results, it is essential to follow best practices in XRF pellet preparation. This section outlines key strategies for method development, attention to detail, and consistency to reduce errors in XRF sample preparation.

XRF Pellet Preparation

Method Development

The first step in reducing errors in XRF pellet preparation is the development of a robust method. This involves understanding the specific requirements of the sample being analyzed and tailoring the preparation process accordingly. The range of sample types for XRF analysis is vast, and each sample may have unique characteristics that necessitate adjustments in the preparation method. For instance, the particle size of the sample, the choice of binder, and the dilution ratio are critical factors that must be carefully considered.

  1. Particle Size: The particle size of the sample can significantly affect the homogeneity of the pellet and, consequently, the accuracy of the XRF analysis. It is generally recommended to use a particle size of less than 100 micrometers to ensure uniform distribution of the sample within the pellet. Larger particles can lead to heterogeneity, resulting in inconsistent readings.

  2. Choice of Binder: The binder used in the pellet preparation process plays a crucial role in ensuring the integrity and stability of the pellet. Common binders include borate glasses, cellulose, and waxes. The choice of binder should be based on the compatibility with the sample and the specific requirements of the XRF analysis. For example, some binders may introduce elements that can interfere with the analysis, so it is essential to select a binder that minimizes such interferences.

  3. Dilution Ratio: The dilution ratio refers to the proportion of the sample to the binder. A proper dilution ratio ensures that the sample is evenly distributed within the pellet, reducing the risk of over- or under-representation of certain elements. The optimal dilution ratio depends on the sample's composition and the analytical requirements. It is often necessary to perform a series of tests to determine the best dilution ratio for a given sample.

Attention to Detail

Attention to detail is paramount in XRF pellet preparation to minimize errors. Small deviations in the preparation process can lead to significant discrepancies in the analysis results. Therefore, it is crucial to maintain consistency in every step of the preparation process.

  1. Pressure Application: The amount of pressure applied during the pellet pressing process is a critical factor that affects the density and homogeneity of the pellet. Insufficient pressure can result in a loose pellet, while excessive pressure can cause the sample to be compressed unevenly. The optimal pressure should be determined based on the sample's properties and the specific requirements of the XRF analysis. Consistency in the pressure applied is essential to ensure reproducible results.

  2. Thickness of the Pellet: The thickness of the final pellet can influence the sensitivity and accuracy of the XRF analysis. A pellet that is too thin may not provide sufficient signal, while a pellet that is too thick can lead to absorption effects that distort the results. The ideal thickness is typically between 1 and 3 millimeters, depending on the sample's composition and the analytical requirements.

  3. Sample to Sample Cross Contamination: Cross contamination between samples is a common source of error in XRF analysis. To minimize this risk, it is essential to thoroughly clean all equipment and surfaces between sample preparations. This includes the pellet press, sample containers, and any other tools used in the process. Additionally, using dedicated tools for each sample can further reduce the risk of cross contamination.

Consistency

Consistency in the preparation process is key to reducing errors in XRF analysis. This involves establishing standard operating procedures (SOPs) and performing regular quality control (QC) and quality assurance (QA) checks.

  1. Standard Operating Procedures (SOPs): Developing and adhering to SOPs ensures that every step of the preparation process is performed consistently. SOPs should include detailed instructions for sample preparation, including the particle size, binder choice, dilution ratio, pressure application, and pellet thickness. Regular training and documentation of the preparation process can help ensure that all personnel follow the SOPs consistently.

  2. Quality Control (QC) and Quality Assurance (QA): QC and QA procedures are essential to monitor the accuracy and reliability of the XRF analysis. This includes the use of certified reference materials (CRMs), blanks, duplicates, and replicates to verify the accuracy of the results. Regular QC checks can help identify any deviations from the expected results and allow for timely adjustments to the preparation process.

  3. Matrix Matching: Matrix matching involves preparing samples with a similar composition to the unknown samples to minimize matrix effects. This can help reduce errors caused by differences in the sample's composition, such as absorption or enhancement effects. Matrix matching is particularly important when analyzing complex samples with varying compositions.

Conclusion

In conclusion, reducing errors in XRF pellet preparation requires a combination of method development, attention to detail, and consistency. By carefully considering factors such as particle size, binder choice, dilution ratio, pressure application, and pellet thickness, and by establishing SOPs and performing regular QC and QA checks, it is possible to minimize errors and ensure accurate and reliable XRF analysis results. The key to successful XRF analysis lies in the meticulous preparation of samples, as even small deviations can lead to significant discrepancies in the final results.

Conclusion: Achieving Precision in XRF Analysis

Mastering PELLET PRESS XRF SAMPLE PREPARATION is crucial for accurate results. By addressing common issues such as particle size, contamination, binder choice, pellet thickness, pressure application, dilution ratio, and cross-contamination, you can significantly enhance the precision of your XRF analysis. Adhering to best practices and maintaining meticulous attention to detail ensures that every aspect of pellet preparation is optimized, ultimately leading to reliable and consistent analytical outcomes. Investing time in perfecting your preparation techniques will pay off in the form of more accurate data and a deeper understanding of your samples.

무료 상담을 위해 저희에게 연락하십시오

KINTEK LAB SOLUTION의 제품과 서비스는 전 세계 고객들에게 인정받고 있습니다. 저희 직원이 귀하의 질문에 기꺼이 도움을 드릴 것입니다. 무료 상담을 원하시면 저희에게 연락하시고 제품 전문가와 상담하여 귀하의 애플리케이션 요구에 가장 적합한 솔루션을 찾으십시오!

관련 제품

자동 실험실 XRF 및 KBR 펠렛 프레스 30T / 40T / 60T

자동 실험실 XRF 및 KBR 펠렛 프레스 30T / 40T / 60T

KinTek Automatic Lab Pellet Press로 빠르고 쉬운 xrf 샘플 펠릿 준비. X선 형광 분석을 위한 다양하고 정확한 결과.

XRF 및 KBR 플라스틱 링 랩 파우더 펠렛 프레스 몰드

XRF 및 KBR 플라스틱 링 랩 파우더 펠렛 프레스 몰드

당사의 플라스틱 링 랩 파우더 펠렛 프레스 몰드로 정밀한 XRF 샘플을 얻으십시오. 매번 완벽한 성형을 위한 빠른 타정 속도와 맞춤형 크기.

XRF & KBR 스틸 링 랩 파우더 펠렛 프레싱 몰드

XRF & KBR 스틸 링 랩 파우더 펠렛 프레싱 몰드

스틸 링 랩 파우더 펠릿 프레스 몰드로 완벽한 XRF 샘플을 생산하십시오. 매번 정확한 성형을 위해 빠른 타정 속도와 사용자 정의 가능한 크기.

XRF 붕산 실험실 분말 펠렛 프레스 금형

XRF 붕산 실험실 분말 펠렛 프레스 금형

XRF 붕산 실험실 분말 펠렛 압착 금형으로 정확한 결과를 얻으십시오. X선 형광 분석을 위한 시료 준비에 적합합니다. 사용자 정의 크기를 사용할 수 있습니다.

XRF 및 KBR 20T / 30T / 40T / 60T용 전동 유압 프레스

XRF 및 KBR 20T / 30T / 40T / 60T용 전동 유압 프레스

전기 유압 프레스로 샘플을 효율적으로 준비합니다. 작고 휴대가 간편하여 실험실에 적합하며 진공 환경에서 작업할 수 있습니다.

자동 실험실 펠렛 프레스 기계 20T / 30T / 40T / 60T / 100T

자동 실험실 펠렛 프레스 기계 20T / 30T / 40T / 60T / 100T

자동 실험실 프레스 기계로 효율적인 시료 전처리를 경험하세요. 재료 연구, 약학, 세라믹 등에 이상적입니다. 컴팩트한 크기와 가열판이 있는 유압 프레스 기능이 특징입니다. 다양한 크기로 제공됩니다.

수동 실험실 수압기 12T / 15T / 24T / 30T / 40T

수동 실험실 수압기 12T / 15T / 24T / 30T / 40T

작은 공간을 차지하는 수동 실험실 유압 프레스로 효율적인 시료 준비. 재료 연구 실험실, 약학, 촉매 반응 및 세라믹에 이상적입니다.

kbr 펠릿프레스 2T

kbr 펠릿프레스 2T

KINTEK KBR Press를 소개합니다 - 초급 사용자를 위해 설계된 휴대용 실험실 유압 프레스입니다.

진공 박스용 수동 실험실 펠렛 프레스

진공 박스용 수동 실험실 펠렛 프레스

진공 박스용 실험실 프레스는 실험실용으로 설계된 특수 장비입니다. 주요 목적은 특정 요구 사항에 따라 알약과 분말을 압착하는 것입니다.

자동 가열식 실험실 펠릿 프레스 25T / 30T / 50T

자동 가열식 실험실 펠릿 프레스 25T / 30T / 50T

자동 가열식 실험실 프레스로 샘플을 효율적으로 준비하세요. 최대 50T의 압력 범위와 정밀한 제어 기능으로 다양한 산업 분야에 적합합니다.

XRD X선 회절 분쇄기

XRD X선 회절 분쇄기

KT-XRD180은 X선 회절(XRD) 분석 시료 준비를 위해 특별히 개발된 소형 데스크탑 다기능 수평식 그라인더입니다.

벤치탑 금 분석기

벤치탑 금 분석기

XRF 200 벤치탑 골드 분석기는 캐럿 또는 금 함량을 평가하는 신속하고 매우 정밀한 방법을 제공하여 품질 관리, 가격 및 실용적인 활용 요구를 충족합니다.

핸드헬드 마이닝 분석기

핸드헬드 마이닝 분석기

빠르고 정확하며 사용하기 쉬운 휴대용 XRF 광산 분석기인 XRF600M은 광업의 다양한 분석 응용 분야를 위해 설계되었습니다. XRF600M은 최소한의 시료 준비로 광석 시료의 현장 분석을 제공하여 실험실 분석 시간을 며칠에서 몇 분으로 단축합니다. 기본 파라미터 방법을 사용하는 XRF60M은 교정 표준 없이도 광석 시료를 분석할 수 있습니다.

휴대용 합금 분석기

휴대용 합금 분석기

XRF900은 다양한 파일에서 금속 분석에 적합한 제품으로, 손 안에서 빠르고 정확한 결과를 제공합니다.

XRD 시료 홀더 / X선 회절 분말 슬라이드

XRD 시료 홀더 / X선 회절 분말 슬라이드

X선 분말 회절(XRD)은 결정질 물질을 식별하고 단위 셀 치수를 결정하기 위한 신속한 기술입니다.

인라인 XRF 분석기

인라인 XRF 분석기

AXR Scientific 인라인 XRF 분석기 Terra 700 시리즈는 유연하게 구성할 수 있으며 공장 생산 라인의 레이아웃과 실제 상황에 따라 로봇 팔 및 자동 장치와 효과적으로 통합하여 다양한 시료의 특성에 맞는 효율적인 검출 솔루션을 구성할 수 있습니다. 전체 감지 프로세스는 사람의 개입 없이 자동화를 통해 제어됩니다. 전체 온라인 검사 솔루션은 24시간 내내 생산 라인 제품의 실시간 검사 및 품질 관리를 수행할 수 있습니다.

XRF 분광기 모듈

XRF 분광기 모듈

과학적인 인라인 XRF 분광기 모듈 시리즈는 유연하게 구성할 수 있으며 공장 생산 라인의 레이아웃과 실제 상황에 따라 로봇 팔 및 자동 장치와 효과적으로 통합하여 다양한 샘플의 특성을 충족하는 효율적인 검출 솔루션을 형성할 수 있습니다.

휴대용 귀금속 분석기

휴대용 귀금속 분석기

고급 세라믹 패키지 마이크로 포커스 X-선 튜브와 고성능 반도체 검출기를 기반으로 하는 XRF990 휴대용 귀금속 분석기는 고급 소프트웨어 알고리즘과 결합하여 보석의 금, 은, 백금 및 기타 귀금속 농도를 빠르고 정확하며 비파괴적으로 테스트하여 보석, 투자 금 및 다양한 귀금속 재료의 순도를 빠르게 식별할 수 있습니다.

휴대용 토양 분석기

휴대용 토양 분석기

XRF600 휴대용 토양 분석기는 토양 및 퇴적물 검사를 위한 중요한 도구입니다. 몇 초 안에 유해 중금속을 검출할 수 있습니다. 현장에서 신속한 토양 스크리닝을 위해 XRF600을 사용하면 분석을 위해 실험실로 보내야 하는 샘플 수를 크게 줄여 분석 비용과 분석 시간을 줄일 수 있습니다. 또한 오염된 지역을 신속하게 스크리닝하고 현장에서 정화 영역을 파악하여 토양 처리 및 정화 비용을 최소화할 수 있습니다.

핸드헬드 코팅 두께

핸드헬드 코팅 두께

휴대용 XRF 코팅 두께 분석기는 고해상도 Si-PIN(또는 SDD 실리콘 드리프트 검출기)을 채택하여 뛰어난 측정 정확도와 안정성을 달성합니다. 생산 공정에서 코팅 두께의 품질 관리 또는 입고 재료 검사를 위한 무작위 품질 검사 및 전체 검사에 관계없이 XRF-980은 검사 요구 사항을 충족할 수 있습니다.

휴대용 리튬 배터리 분석기

휴대용 리튬 배터리 분석기

고급 세라믹 패키지 마이크로 포커스 X-선 튜브와 고성능 반도체 검출기를 기반으로 하는 XRF970 휴대용 리튬 배터리 분석기는 고급 소프트웨어 알고리즘과 결합하여 리튬 배터리의 Ni, Co, Mn 및 기타 규제 원소를 빠르고 정확하게 분석할 수 있습니다. 리튬 배터리 제조업체의 공정 품질 관리 및 안전 예방 조치와 폐 리튬 배터리 재활용 업체의 선별 작업에 이상적인 휴대용 분석기입니다.

PTFE 샘플링 스푼/용액 스푼/샘플 스푼/건식 파우더 스푼

PTFE 샘플링 스푼/용액 스푼/샘플 스푼/건식 파우더 스푼

용액 스푼 또는 샘플 스푼이라고도 하는 PTFE 샘플링 스푼은 다양한 분석 공정에서 건조 분말 샘플을 정확하게 주입하는 데 중요한 도구입니다. PTFE로 제작된 이 스푼은 뛰어난 화학적 안정성, 내식성 및 비점착성을 제공하여 실험실 환경에서 섬세하고 반응성이 강한 물질을 취급하는 데 이상적입니다.

작고 컴팩트한 접착제 균질화기

작고 컴팩트한 접착제 균질화기

최적의 균질화 결과를 위한 4인치 PP 챔버, 내부식성 디자인, 사용자 친화적인 LCD 디스플레이 및 사용자 정의 가능한 속도 설정을 갖춘 실험실에서 정밀한 시료 준비를 위한 컴팩트하고 효율적인 접착제 균질화기입니다.

높은 처리량의 티슈 그라인더

높은 처리량의 티슈 그라인더

KT-MT는 식품, 의료, 환경 보호 등 다양한 분야에서 분쇄, 분쇄, 혼합, 세포벽 파괴에 사용되는 고품질의 소형 다용도 조직 분쇄기입니다. 24개 또는 48개의 2ml 어댑터와 볼 그라인딩 탱크가 장착되어 있으며 DNA, RNA 및 단백질 추출에 널리 사용됩니다.

크로스 퍼커션 밀

크로스 퍼커션 밀

다양한 연질, 질질, 섬유질 및 경질 건조 시료에 적합합니다. 배치 처리 및 연속 거친 파쇄 및 미세 파쇄에 사용할 수 있습니다. (동물 사료, 뼈, 케이블, 판지, 전자 부품, 사료 펠릿, 호일, 식품 등).

전극 연마재

전극 연마재

전기 화학 실험을 위해 전극을 연마하는 방법을 찾고 계십니까? 당사의 연마 재료가 도움이 될 것입니다! 최상의 결과를 얻으려면 쉬운 지침을 따르십시오.

하이브리드 티슈 그라인더

하이브리드 티슈 그라인더

KT-MT20은 건조, 습식 또는 냉동 상태의 작은 시료를 빠르게 분쇄하거나 혼합하는 데 사용되는 다용도 실험실 기기입니다. 50ml 볼 밀 용기 2개와 DNA/RNA 및 단백질 추출과 같은 생물학적 응용 분야를 위한 다양한 세포벽 파괴 어댑터가 함께 제공됩니다.


메시지 남기기